Keeping receipts saved and organized is a critical step to maintaining tax-ready books. While it's generally recommended to save receipts for transactions over $75, attaching receipts whenever available helps you stay prepared for tax time.
Here's how to add receipts to Found:
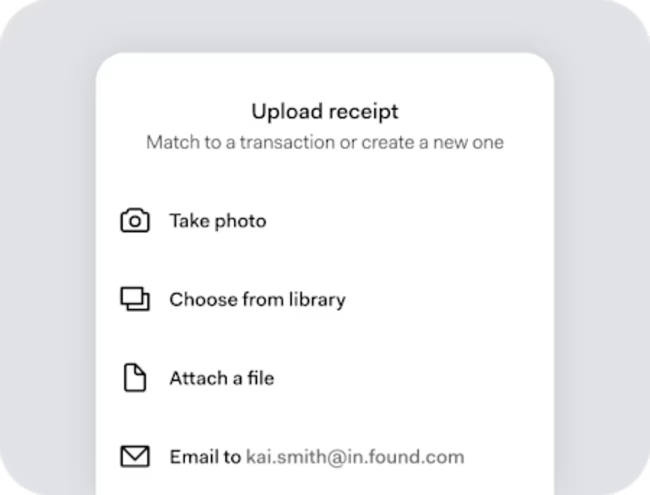
In your Found mobile app, you can see options to add a receipt on-the-go:
Navigate to the Activity tab (clock icon)
Tap the + button
Select "Scan receipt"
Take a photo, upload from your device, or copy your unique Found email address to email your receipt to Found
Found will create a new expense and attach the receipt.
If you have an existing transaction in Found, you can also attach a receipt in your Activity feed.
Go to your Activity feed and select the transaction
Tap the Receipt icon below the transaction amount
Take a photo with your phone or upload an image from your device
Your receipt is now attached to that transaction and safely stored.
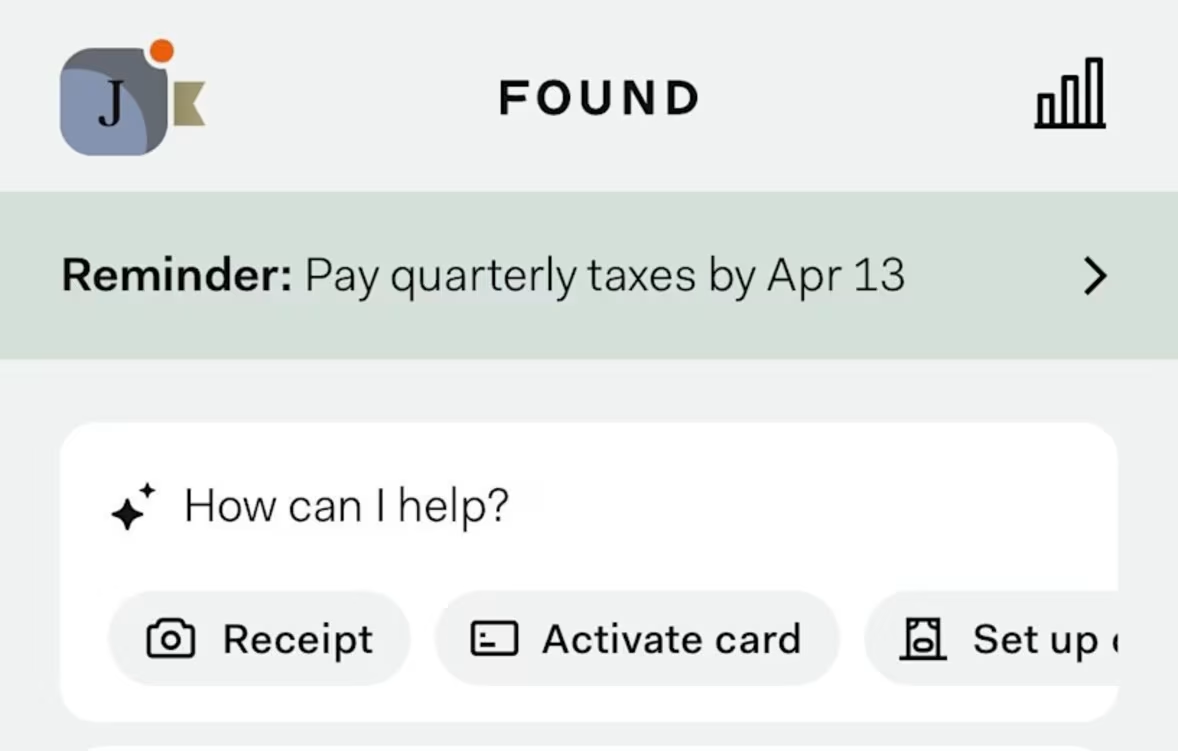
Found Assistant can help streamline receipt management by automatically matching receipts to expenses or creating a new one.
Tap “How can I help?” at the top of the Banking screen in your Found app or in the top right corner on desktop in order to open Found Assistant.
Tap the Receipt pill or say that you want to upload a receipt in the chat
Upload a receipt or take a photo
Assistant attempts to match the receipt to an existing expense with corresponding information
If no matching expense exists, Assistant can create a new expense record in just a few taps.
Found does not provide legal or tax advice. Found Assistant is in beta and can make mistakes. Users are advised to consult with professionals with specific advice.
You can forward receipts directly from your inbox to your unique Found email address.
Your unique Found email address will be [your Found Tag]@in.found.com (e.g. for the Found Tag ‘leslie-knoll’, your email would be leslie-knoll@in.found.com)
To find your Found Tag:
Tap on your profile (top left on mobile, top right on desktop)
Tap the Settings icon
Scroll down to Found Tag
Alternatively, you can copy your unique Found email address from the mobile receipt upload flow outlined above.
Once you have your unique Found email address:
Send an email to that unique Found email address with a receipt attached.
Found will process each attachment and attempt to match it to an existing transaction.
If no match is found, Found will create a new manual expense and attach the receipt.
You'll receive a confirmation email with a link to review and refine the details if needed.
Important: For security, this only works with emails sent from the email address you have on file with Found. Found supports PDF, JPG, and PNG files up to 50MB.
